Viewing the Waveform Orchestra
The Orchestra Editor for digital sound synthesis allows you to design a scheme of waveforms and instruments, then use this scheme to generate sounds.
Downloading an Orchestra File
The file WaveformOrch.xml implements each of the waveforms described in the
Catalog of Waveforms. It also implements an instrument imposing a simple envelope upon
an oscillator. This instrument provides one test tone for each waveform.
The text that follows explains how to view the various components of the orchestra, including the main document attributes,
the waveforms, the waveforms, the instrument, and its test tones. Once you have learned how to navigate to a test tone,
you'll learn how to generate a test wavefile, and to hear the result.
Follow the instructions given in here to download WaveformOrch.xml into a working folder under your home directory.
Loading the Orchestra Editor
Initially, the orchestra editor should resemble Figure 1.
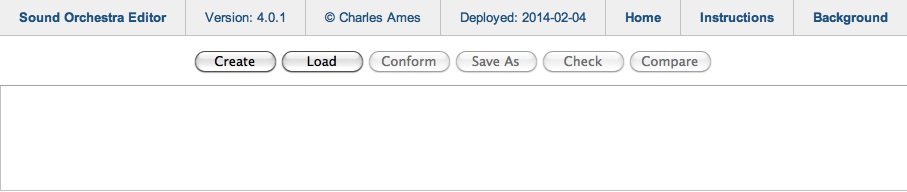
Figure 1: The orchestra editor without a file.
To load the file, click on ![]() and use the file chooser to locate
and use the file chooser to locate WaveformOrch.xml
in its download directory.
Since many flavors of XML file are employed on this site, I like to clarify that a file describes an orchestra by appending “Orch” just
before the dot. However the Orchestra Editor enforces no such naming conventions. Instead, the file chooser checks file in the
current directory. If the file has an XML extension, the chooser peeks into the file to discern if it references the proper XML
schema.
XML files which reference the proper schema are highlighted in the file list (as are directories). Files without XML extensions, or XML files
which do not reference the proper XML schema, are greyed out.
Once the file is successfully loaded, the orchestra editor will display the file path and the topmost component of the configuration scheme. This new display is shown in Figure 2.
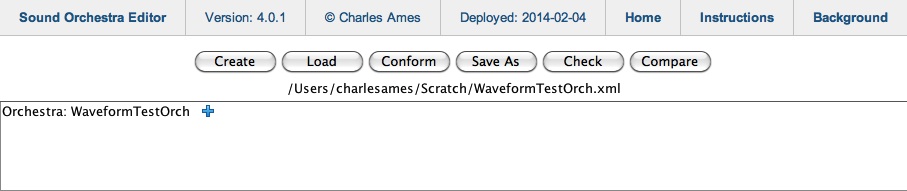
Figure 2: The applet after
WaveformOrch.xml has been loaded.
Viewing Orchestra Attributes
To the right of the Orchestra: WaveformOrch component is a show-content icon ( ).
Clicking on this icon reveals the child items shown in Figure 3.
Notice that the show/expand icon toggles to a hide/collapse icon (
).
Clicking on this icon reveals the child items shown in Figure 3.
Notice that the show/expand icon toggles to a hide/collapse icon ( ).
).
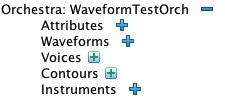
Figure 3: Expanding the Orchestra component reveals five child items.
Expand Attributes by clicking on the item's icon.
This action reveals the document-attribute editing panel pictured in Figure 4.
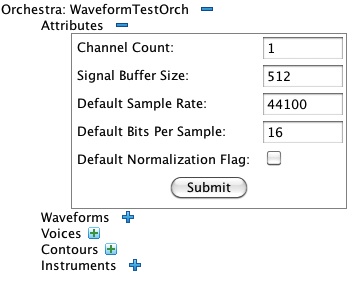
Figure 4: Expanding the Attributes component reveals an attribute-editing panel.
Attribute panels are the exception to the practice of saving changes immediately to file.
Within any attribute panel, you make whatever attribute changes you wish and then click on ![]() .
The editor checks your choices.
Only if it agrees with these choices does the editor save the changed attribute values to file.
.
The editor checks your choices.
Only if it agrees with these choices does the editor save the changed attribute values to file.
There are five document attributes:
- Channel Count — Configures the wavefile output as mono (1) or stereo (2).
- Signal Buffer Size — Leave this at 512 unless you have a good reason to change it.
- Default Sample Rate — The number of samples per second, per channel. Test tones internal to the orchestra employ this sampling rate. Used for note lists only when the note list does not explicitly state its own sampling rate.
- Default Bits per Sample — Configures the wavefile output as 16-bit or 32-bit precision. This value is used for note lists only when the note list does not explicitly state its own bits per sample. Test tones internal to the orchestra always employ 16-bit precision.
- Default Normalization Flag — indicates whether or not output should be normalized so that the maximum sample amplitude is 32767. If so, output is first written to a temporary wavefile with 32-bit precision, then a second permanent wavefile is generated with the requested sample precision. This flag is used for note lists only when the note list does not explicitly provide its own normalization flag. Test tones internal to the orchestra are never normalized.
Viewing Waveforms
Continue your tour by hiding () the attributes panel,
then expanding () the Waveforms collection.
The editor should now appear as pictured in Figure 5.
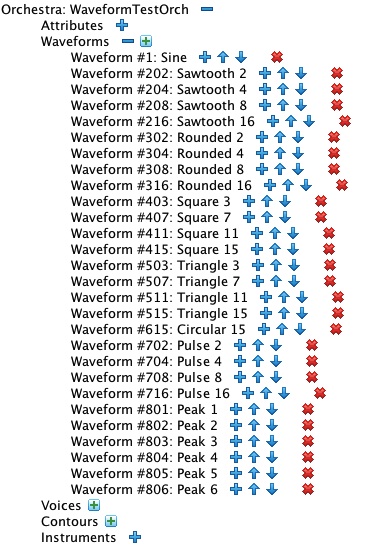
Figure 5: Expanding the Waveforms collection reveals a list of Waveform items.
Six new control icons are revealed in Figure 5:
- Add new item.
- Resequence items.
- Shift item up.
- Shift item down.
- Push items down.
- Delete item.
Were just looking right now, so don't touch ANY of these. Instead, click on for Waveform #304: Rounded 4.
Next, click on for both the Attributes and Harmonics items.
The editor should now appear as pictured in Figure 6.
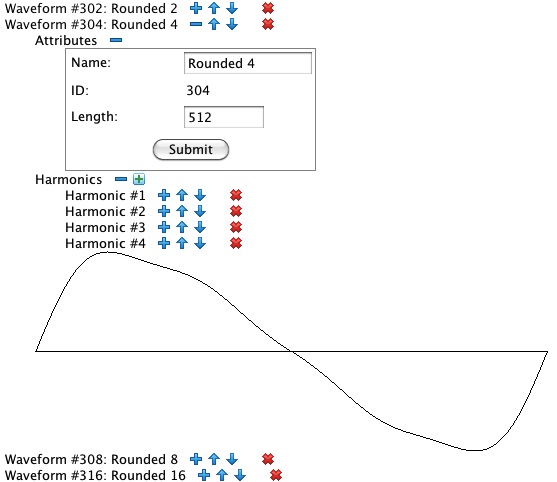
Figure 6: Each Waveform item has an Attributes panel and a Harmonics collection.
Waveform #306 in Figure 6 four harmonics. Harmonic #1 is the fundamental, harmonic #2 is the first (octave) overtone,
harmonic #3 is the second (octave + fifth) overtone, and so forth. To view the amplitude and phase of the first overtone, click on
for Harmonic #2 and click on for the Attributes item.
The entry for Harmonic #2 should now expand as pictured in Figure 7.
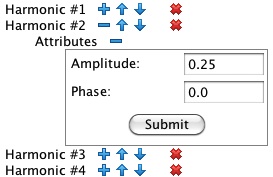
Figure 7: Attributes panel for Harmonic #2.
Each Harmonic item has two Attributes:
-
Amplitude — amplitude values are relative, ranging from not-quite-zero upwards.
The waveforms in
WaveformOrch.xmlconsistently represent the largest amplitude (not necessarily the fundamental) as unity. When the Sound engine generates a waveform, it first uses the harmonic information to generate a raw shape, then normalizes this shape so that the largest sample magnitude is unity. - Phase — phase values range from zero to unity, which corresponds to the range from 0 to 360 degrees.
Viewing An Instrument
The tour now shifts from waveforms to instruments.
Hide () the Waveforms collection,
then expand () the Instruments collection.
Expand Instrument #1: LinenOscillator; under that, expand Attributes,
Parameters, Signals, and Units.
The definition for Instrument #1: LinenOscillator should now appear as pictured in Figure 8.
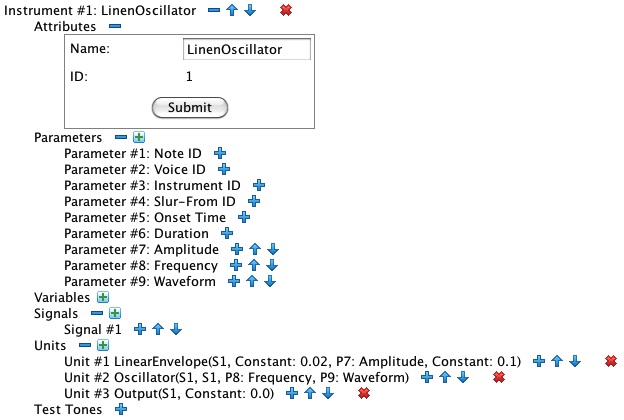
Figure 8: Definition of Instrument #1: LinenOscillator.
Instrument #1 contains three units.
- Unit #1 generates the envelope, placing results in signal #1.
- Unit #2 generates the tone. It takes in the tone's amplitude profile from Signal #1, then overwrites Signal #1 with its own output.
- Unit #3 mixes the shaped tone into channel #0.
Note statements invoking Instrument #1 are expected to have 9 parameters. Of these, parameters 1-6 are predefined and unmodifiable (hence no shift-item-id icons). Explanations of these parameters may be found here. The definitions of 7-9 are specific to Instrument #1.
- Parameter #7 feeds into Unit #1's Amplitude input.
- Parameter #8 feeds into Unit #2's Frequency input.
- Parameter #9 feeds into Unit #2's Waveform input.
Viewing Test Tones
The tour now drills down into the current instrument's test tones.
Under Instrument #1: LinenOscillator, collapse () the
Attributes, Parameters, Signals, and Units
items.
Now expand () the Test Tones collection.
The definition for Instrument #1: LinenOscillator should now appear as pictured in Figure 9.
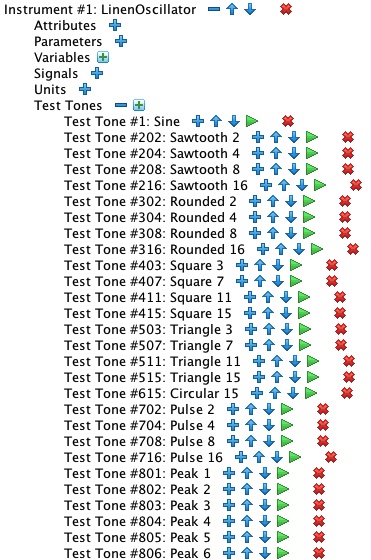
Figure 9: Test tones for Instrument #1: LinenOscillator.
To see how Test Tone #304: Rounded 4 links to Waveform #304: Rounded 4, expand ()
Test Tone #304: Rounded 4. Under that, expand both Attributes and
Test Parameters. Now reveal the Attributes panels for
Test Parameter #7: Amplitude, Test Parameter #8: Frequency,
and Test Parameter #9: Waveform. Notice in Figure 10 that the value for
Test Parameter #9: Waveform is 304.0, which is the desired waveform ID.
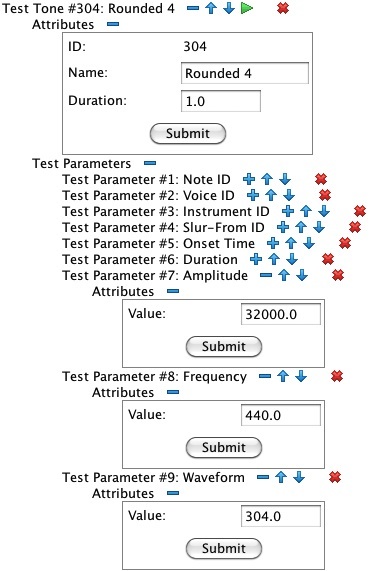
Figure 10: Definition for Test Tone #304: Rounded 4.
Hearing Test Tones
Collapse the items under Test Tone #304: Rounded 4.
To hear a test tone, you must first generate a wavefile.
Clicking on the the run icon ( ) initiates a progress dialog resembling Figure 11.
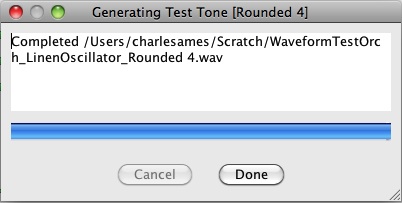
Figure 11: Test-Tone Progress Dialog.
This dialog contains a text field identifying the wavefile path, a progress bar, and two buttons.
You can click on ![]() to abort wavefile generation in progress.
This button greys out when the file completes. Click on
to abort wavefile generation in progress.
This button greys out when the file completes. Click on ![]() to return to
the orchestra editor.
to return to
the orchestra editor.

Figure 12: A play-sound icon (
 ) appears for Test Tone #304: Rounded 4
when the wavefile is ready.
) appears for Test Tone #304: Rounded 4
when the wavefile is ready.
When the Sound engine has successfully generated a wavefile, a play-sound icon () appears
just right of the run icon.
Clicking will toggle the icon to  and begin the tone. While the tone
is playing you can click on to stop it. When the tone completes,
toggles back to .
and begin the tone. While the tone
is playing you can click on to stop it. When the tone completes,
toggles back to .
| © Charles Ames | Page created: 2014-02-22 | Last updated: 2017-08-15 |